If you’re looking for a new grout to add to your repertoire, then try the revolutionary epoxy resin grout that is Joint-It Dynamic. Explore the five benefits of resin grouting, plus how the versatility of this unique grout can save your paving business money.
In this article we dig into the perks of Joint-It Dynamic, including how it can be used with BOTH permeable and impermeable bedding mortars. We also cover the eight-step process of how to install this epoxy grout together with photos of each stage and expert application tips for porcelain, slate and granite.
You’ll also find answers to top questions asked by contractors so your resin grouting can achieve maximum results with minimal effort.

What is resin grouting?
Resin grouting involves jointing a patio using a combined mixture of resin binder, hardener and high-grade sand. When combined together, the formula creates a strong, flexible and remarkably long-lasting bond that is resistant to weeds, frost and stains.
The incredible strength of resin grouts make them an ideal choice for driveways and paved areas that need to withstand heavier loads. They can be used with natural stone, concrete pavers and even porcelain paving.
Also known as epoxy grouts, resin grouts are loved by contractors and homeowners alike for their longevity and low maintenance requirements. Plus, grouts like Joint-It Dynamic are remarkably easy to apply once you know how.
Read our full guide below on how to install Joint-It Dynamic, together with photos of each stage of the process.
For now, let’s delve into the main benefits of resin grouting in more detail, and specifically when using Joint-It Dynamic resin grout.
5 benefits of resin grouting with Joint-It Dynamic
Joint-It Dynamic is a high-grade resin grout that can be quickly and simply applied with minimal effort and equipment.
Resin grouting with Joint-It makes it easy to achieve a strong and stable patio that boasts a pristine finish, and one that lasts for years to come.
Here are just a few of the benefits of resin grouting:
#1 Outstanding durability, especially for driveways
One of the major reasons why landscapers use resin grouts is for the outstanding toughness and longevity many of the formulas offer.
Formulated with cutting-edge resins, hardeners and sands, Joint-It Dynamic is a revolutionary dual-system resin grout that offers exceptional durability. As such it is an ideal choice of grout for driveways or areas that need to withstand heavier loads.
Weed resistant, waterproof and repellent to frost, epoxy resin grouts are virtually impervious to stains.
#2 Can be used with both permeable and non-permeable beds
If you’re looking for a truly versatile jointing compound for your business, then choose a product that can be used with all types of bedding mortars.
Joint-It Dynamic is a completely versatile grout. Due to the strength of the glues, the Joint-It resin grout can be used with either an impermeable bedding mortar or a permeable bedding mortar, and both with incredible results.
When using Joint-It Dynamic on a fully permeable bed, surface water is able to fully drain through the joints, deeming the project compliant with sustainable urban drainage (SUDS) requirements. Please note that your paving should still incorporate a fall.
#3 Considerable savings for paving contractors
While resin grouts are sometimes considered more pricey than other jointing solutions, as a paving contractor you can make considerable cost savings when buying in bulk.
It’s impossible to know what type of paving jobs will come your way over the next six to 12 months. But with Joint-It Dynamic you can reap the rewards of buying in bulk and be safe in the knowledge that your grout can be used for all types of jobs (non-permeable and SUDS compliant).
The Joint-It resin grout has a 12-month shelf life with a manufacturer guarantee. However, the Joint-It team says the materials are stored in quality vacuum-packed bags that should last for five years.
Call us for discounted prices on bulk orders of Joint-It Dynamic.
#4 Minimum effort and equipment required
In the past, resin grouting was sometimes deemed as more difficult than other grouting methods. Now, with the right product, applying resin grouts can actually be an extremely easy process.
With Joint-It Dynamic resin grout, all you need for installation is a brush, paddle mixer and access to clean water. The grout can even be applied in all weathers, rain or shine, from 3ºC and rising to 30ºC.
Although loved by contractors, Joint-It Dynamic is also considered an easy-to-use product for homeowners. In fact, the glues used in this resin grout are so strong that you can never over-water during installation. Remarkably, the glue will still cure when submerged in water!
Read on for the eight simple installation steps, from prepping the surfaces and right through to the final cure with useful photos of each stage to show you how.
#5 Low maintenance requirements
A big plus for home and property owners on using resin grouts is the lack of ongoing cleaning and maintenance requirements.
Epoxy resin grouts are cement-free and water resistant. They do not attract mould spores and therefore require very little maintenance when compared with other types of grouts.
Which paving materials can Joint-It Dynamic be used with?
Joint-It Dynamic resin grout is suitable for use with natural stone and concrete paving, including:
- Porcelain
- Sandstone
- Limestone
- Slate
- Concrete slabs or paving
- Yorkstone
- Granite
- Quartz
When installing slate or granite pavers, see the expert tips below on how to pre-soak and seal these types of highly porous paving slabs.
Required joint sizes and shapes
Joint-It Dynamic resin grout requires a minimum joint width of 5mm wide and 20mm deep. It is not suitable for V joints.
When working with porcelain paving with joints smaller than 5mm wide and at least 10mm deep, use Joint-It Porcelain Epoxy Grout.
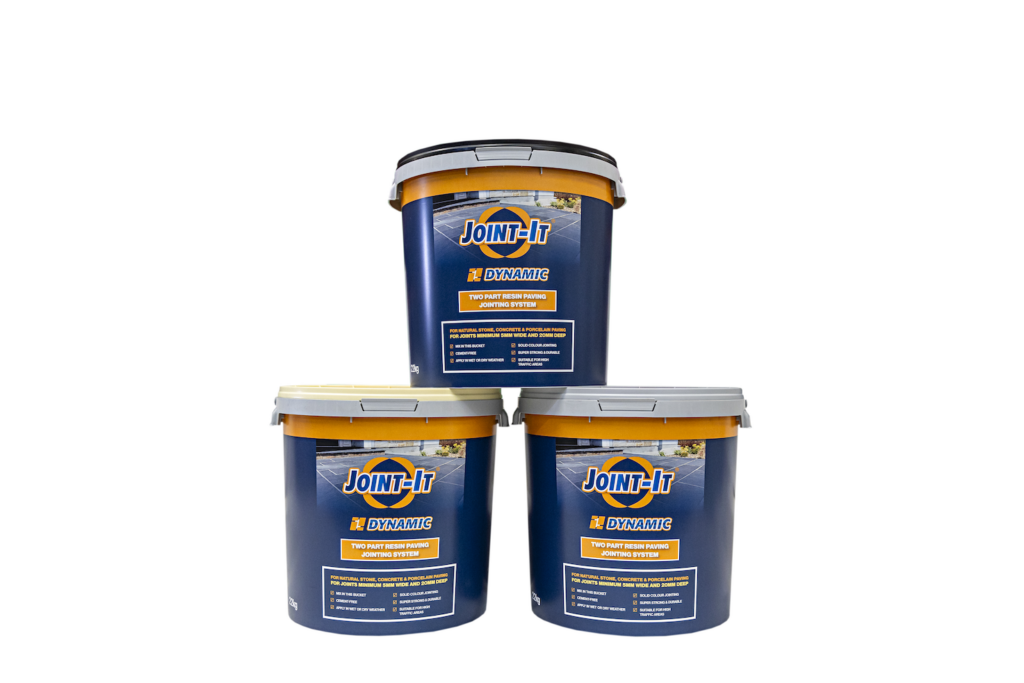
One bucket of Joint-It Dynamic covers approximately 18m2, depending on the paving slab and joint sizes.
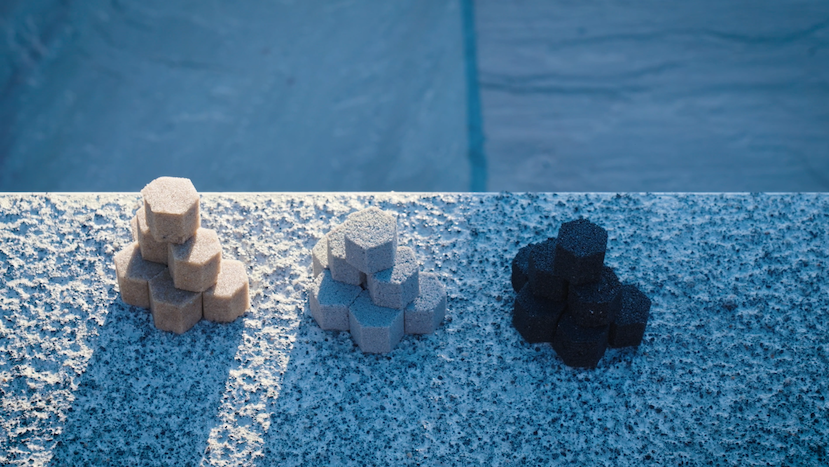
Joint-It Dynamic grout colours
Choose from three grout colours to either complement or contrast your paving materials:
- Buff
- Grey
- Black
How to apply Joint-It Dynamic
Follow these easy instructions on how to apply Joint-It Dynamic resin grout for the best results.
Before installing any grout, ensure your paving is firmly secured on a stable foundation consisting of a compacted sub-base and bedding mortar. Professional landscapers recommend using a priming slurry to secure pavers in place.
If your paving materials are highly porous, they may need to be pre-sealed before installing the grout. Read on for details of the types of pavers that require pre-sealing.
Equipment required for installation
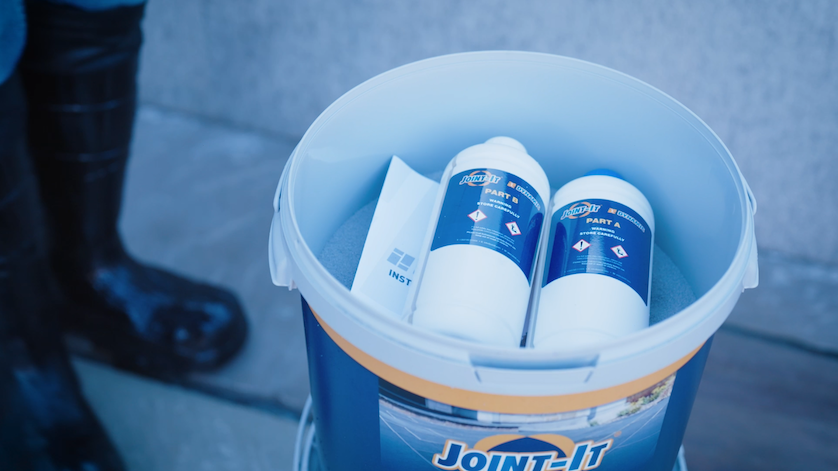
All you need for installing Joint-It Dynamic resin grout is a:
- Hard bristled and soft bristled brush, or ideally a Neoprene squeegee
- Bucket of Joint-It Dynamic
- Paddle mixer
- Hose pipe and access to clean water
- Finishing bar or trowel (optional)
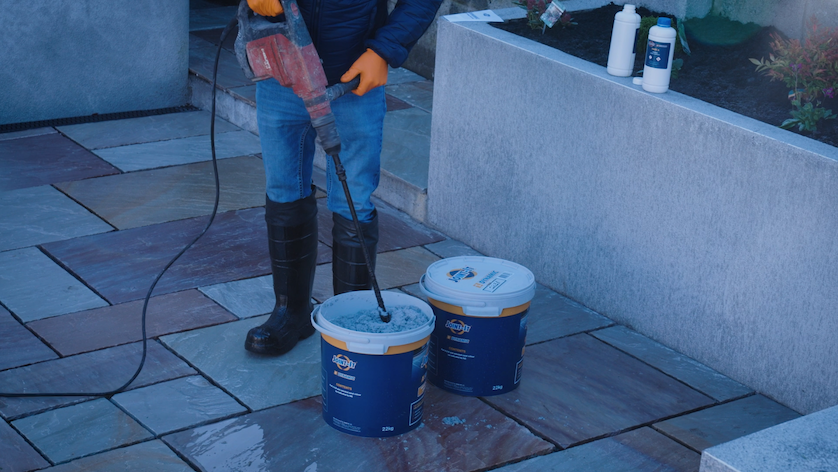
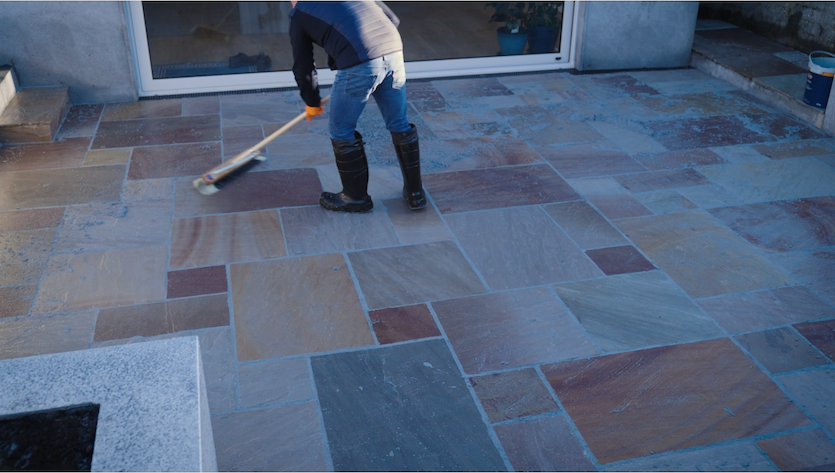
Step 1: Clean the paved area
First up, ensure the paving is ready to be grouted by removing any dust or debris from the paving joints and surfaces.
Expert tip: a leaf blower is the easiest way to remove dirt and debris from paving joints before applying grout.
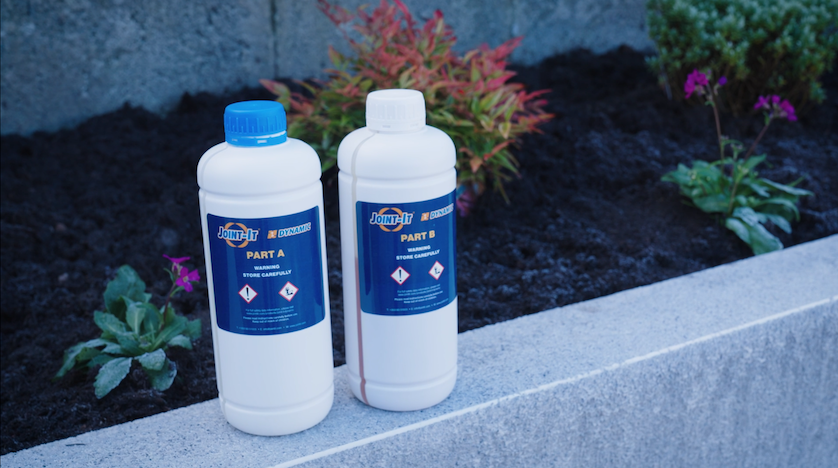
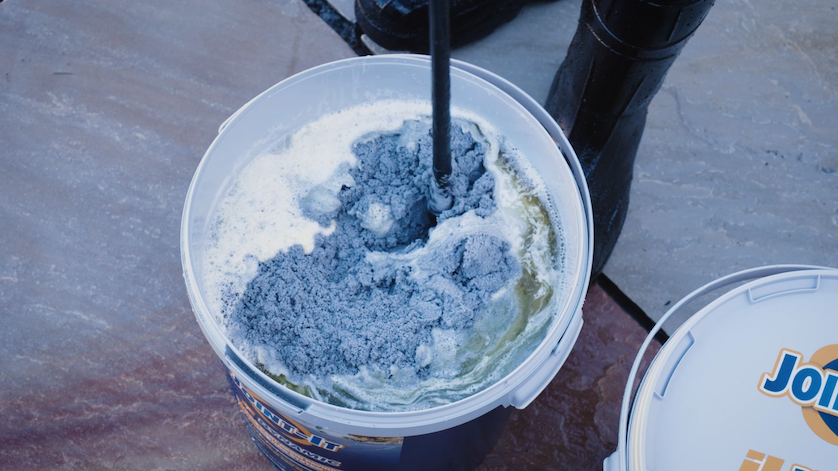
Step 2: Mix the products together
Open the Joint-It Dynamic bucket and remove the two bottles of liquid – the resin binder (Part A) and the hardener (Part B). You will be left with the sand in the bucket.
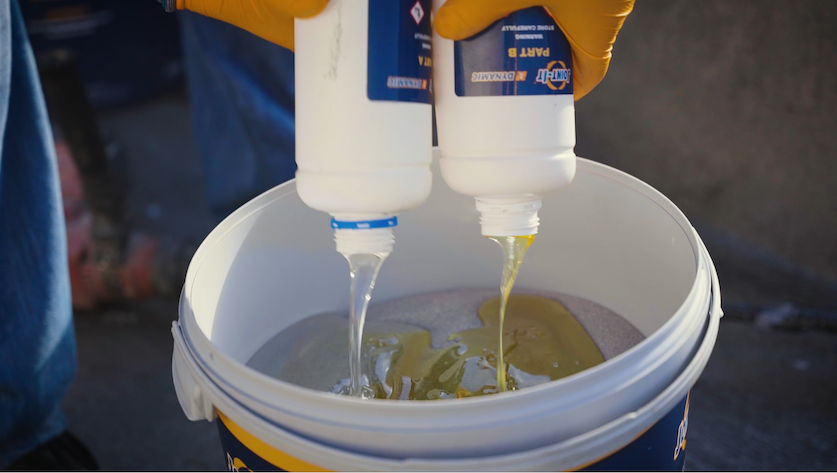
When ready to apply the grout, pour both bottles into the sand and mix thoroughly using a paddle mixer. Three minutes should be enough time to ensure the mixture is completely combined.
Step 3: Add water to the mixture
Next, add 2 litres of clean water to the bucket. Combine the final formula using the paddle mixer. You want to achieve a uniform consistency.
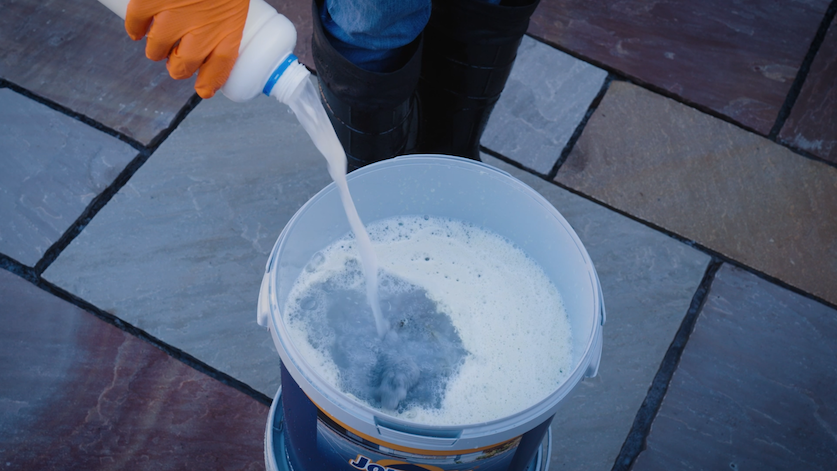
Expert tip: use the bottles from the resin and hardener to measure and add 2 litres of water. By doing so, you’ll also ensure all the formula has been completely removed from the bottles.
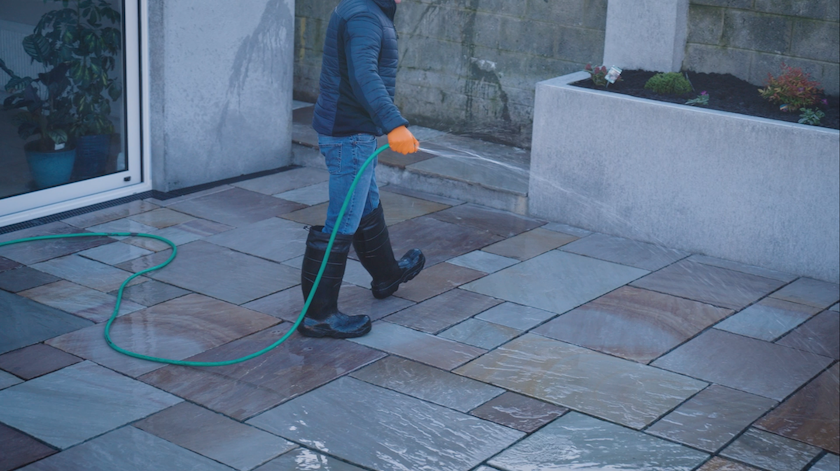
Step 4: Soak the paving slabs
Before applying the grout, thoroughly soak the paving slabs with water to wet the surfaces and joints.
Expert tip: Never allow the paved surfaces to dry out during application. Have a buddy on hand to keep re-wetting the pavers.
Rest assured, you cannot over-water when installing this grout – the glues are so strong that they can still cure when submerged in water.
Step 5: Apply Joint-It Dynamic
With the pavers wet, immediately apply the resin grout formula into the joints using the hard-bristle brush or, for smooth paved surfaces, a rubber squeegee.
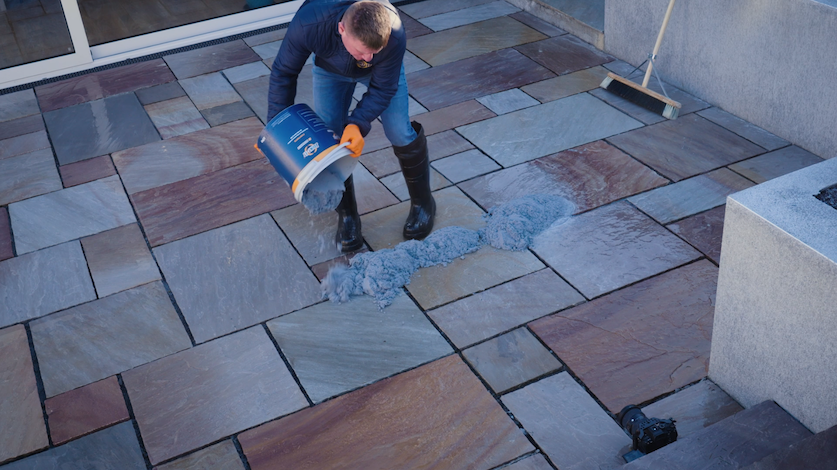
Ensure the paving is still fully saturated with water and that all the joints are completely filled to the top.
Expert tip: many professional landscapers use the Neoprene squeegee for the quickest and easiest way of installing grouts. These specially formulated squeegees glide effortlessly over patio surfaces, smoothing the grout into the joints and allowing you to easily remove any excess. The Neoprene can even be used on rough and uneven surfaces.
Discover the four main benefits of using a Neoprene squeegee over long-handled brushes and standard rubber squeegees.
Step 6: Wait for the initial cure
Now it’s time to wait for the grout’s initial cure.
On cooler days of outdoor temperatures between 3ºC and 15ºC, allow 15–30 minutes.
On warmer days, wait for 10–15 minutes for this initial cure.
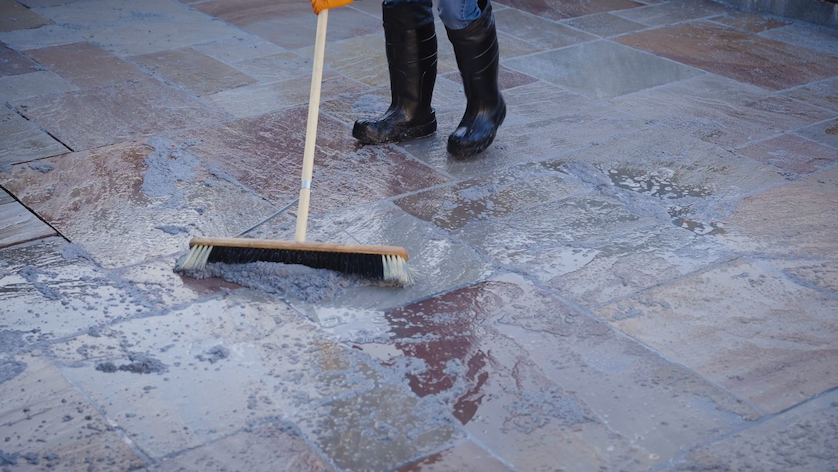
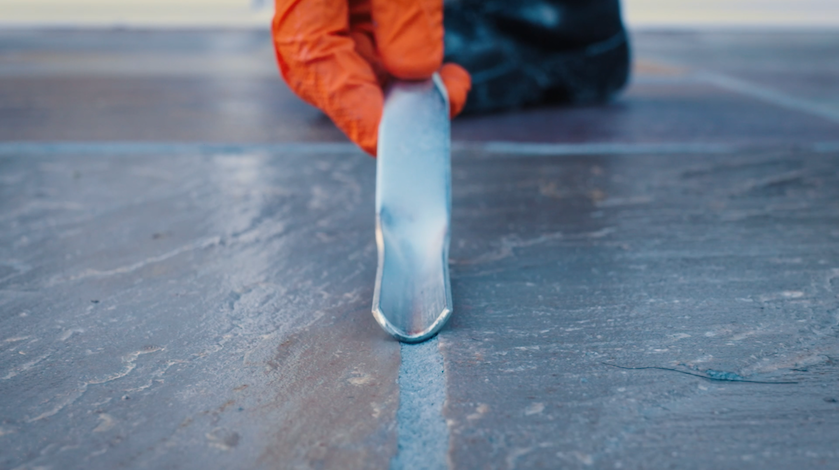
Step 7: Remove excess grout
Using either a soft-bristle brush or long-handled squeegee, thoroughly sweep off all of the excess grout from the top of the paving.
You must ensure all excess sand has been removed from the surfaces. All joints must still be completely filled to the top. If they are not full, top them up with the mixed formula.
Expert tips: remove excess grout at a 45º angle to the paving to avoid inadvertently scooping out grout from inside the joints.
To achieve a smoother finish, use a finishing bar or trowel to strike off the joints while still ensuring the product is filled to the top.
Once this step is complete, clean all tools and brushes with copious amounts of soapy water.
Step 8: Allow to cure for 24 hours
Finally, allow Joint-It Dynamic to cure for approximately 24 hours, longer during colder weather.
The paving should not be walked on during this curing time. Gently test the joints to make sure they have fully set.
Do pavers need to be pre-sealed?
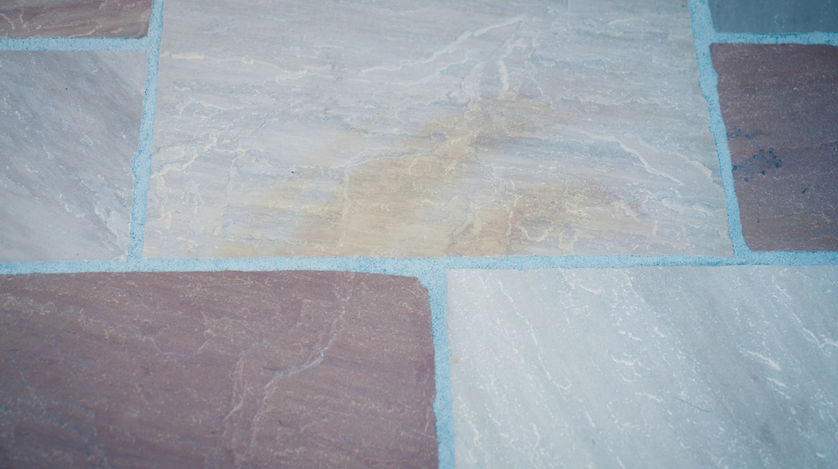
When working with highly porous paving materials, such as slate, black/blue limestone or flamed/honed black granite, you must pre-seal them before installing the grout.
Without pre-sealing highly porous pavers, they may draw the colour of the Joint-It Dynamic resin grout into the stone and create a residue.
Read more expert tips on sealers and when to seal a patio.
Slate or granite installation tips
As highly porous pavers, slate and granite slabs are known to absorb water at different rates. Surprisingly, absorption rates can even differ between slabs within the same batch.
When using slate or granite pavers, take a moment after soaking them to allow time for the stone to absorb the water before applying the grout. You may need to repeat the soaking process before installation.
Small dots on the paving slabs indicate that part of the slab was of a harder density. This residue should weather-off after three to six months.
As mentioned earlier, slate and granite pavers need to be pre-sealed before applying grout.
Porcelain paving installation tips
Porcelain is a much smoother stone and, as such, doesn’t absorb water to the same degree as other natural stones.
For the best results when working with porcelain, keep both the top of the pavers and the product saturated with clean water. This will allow Joint-It Dynamic to flow into the joints more easily.
Alternatively, Joint-It Porcelain Epoxy Grout is a specialist resin grout for porcelain pavers. It can be used with joint sizes of 1–5mm wide and at least 10mm deep.
Common questions
Is resin paving grout any good?
While some cement-based grouts are prone to stains, epoxy resin paving grout is extremely strong and durable making it highly resistant to stains, breaks, chemicals and weathering.
Resin grouts like Joint-It Dynamic are high-grade formulas consisting of:
- a resin binder that withstands environmental changes and temperature fluctuations
- a hardener to initiate the curing process
- quality sand carefully sourced for consistency and reliability.
For an impressive and long-lasting patio with low maintenance requirements, simply combine each of the three components together in the supplied bucket and apply to wet paving surfaces using a brush or rubber squeegee.
How long does Joint-It Dynamic take to cure?
After installing Joint-It Dynamic, you must allow the resin grout to cure for approximately 24 hours before walking on the paving.
During temperatures of below 20ºC, it may take a little longer for the product to cure. Gently test the joints to ensure the grout has fully hardened before walking on the patio.
Which bedding mortar should I use with Joint-It Dynamic?
One of the many great things about using Joint-It Dynamic is that it can be installed alongside both types of bedding mortars – both permeable mortars and non-permeable mortars.
Explore bedding mortar options
Can I install Joint-It Dynamic in all types of weather?
Joint-It Dynamic can be installed in most types of weather. Temperatures must be a minimum of 3ºC and rising and up to a maximum of 30ºC.
When applying the resin grout on cold days, postpone installation if the temperature is likely to drop close to or below freezing within the next 12 hours. Water in the final formula may freeze when it hits the ground, making it too difficult to sweep into the joints.
Never apply the resin grout if the temperature is above 30°C. Hot temperatures will cause the water to evaporate too quickly. Wait for a cooler day, or apply the grout in the early morning or late afternoon.
Applying Joint-It Dynamic during wet weather makes installation even easier. Surfaces must always be kept wet when installing this resin grout and you can never overwater.
Can I use a power washer with Joint-It Dynamic?
Yes, a power washer can be used to clean pavers that have been pointed with Joint-It Dynamic. We recommend waiting a minimum of 30 days to ensure the resin grout has fully cured and settled within the joints.
As with all grouts, never point the nozzle of a power washer directly into the joints.
What happens if I don’t use enough water during application?
When applying Joint-It Dynamic, you must ensure the paving slabs are fully saturated with water and are kept wet during application. If not enough water is applied, the pavers may draw the product into the stone causing a temporary colour enhancement. This can take up to 12–16 weeks to fade.
Be extra vigilant about applying enough water to the area when working on large paved areas and also during warmer weather. We recommend having a buddy to work the hose and ensure the surfaces are wet while you work the product into the joints.
Important note: always read the product’s instructions before installation. While we have done our best to provide accurate and expert knowledge for application, formulas and instructions can change from time to time.
If you have any questions about resin grouting or other paving products, please get in touch with our team of paving experts. We can also happily provide you with the full technical datasheets.


